Archive for the ‘retronews’ Category

Tweed Ride Recap

Wednesday, November 2nd, 2011
Heather and Johnny riding through Boston Common

(Reposted from Danno’s blog Pedaling with the Pugatch’s)

The 3rd Annual Boston Tweed Ride was a success. The 5th tweed ride I have organized in just 3 years with the first and third rides extra tweediness to keep our metal machines happy. The turnout was perfect, not too many and not too little. We did attract attention as the Boston Globe sent their photographer Erik Jacobs down to follow us around for the day. The ride followed the famous Emerald Necklace from Boston Common all the way to Franklin Park. Every inch of road and path was filled with the beauty of Boston and the skill of Fredrick Law Olmsted an architect with an expertise in green spaces from over a century ago. The best part of this ride was seeing all these gorgeous locales in and around Boston that I have never seen before despite living less than 30 miles away my entire life.

pumping air into all tires is the key to a successful group ride

This year’s ride came with the help of our new friend Devon Kurtz whom chose the route, one that was more exciting than my original plan to ride to Concord and commuter rail the way home. All the riders were in awe from the effect fall had on our ride. It truly was as our flyer called the ride Autumanal Bliss.

gratuitous shot of my bum!

Once we reached Franklin Park, we all rested and had a picnic before returning via the Southwest Corridor bike path. A few of us went to the Salty Pig in Back Bay before bidding adieu. Another neat part of the ride was our friend Boris came up from New York City and rented a Hubway bike to check them out. Normally he comes with his Raleigh Twenty but he wanted to check the bikes out and we are glad he did. They are as advertised practical errand bikes.

All photographs from Boston Globe photographer Erik Jacobs.

riding down Commonwealth Avenue

Boston’s 3rd Annual Tweed Ride

Friday, September 16th, 2011

Join us on Sunday October 16th at the Frog Pond located in Boston Commons for our 3rd Annual Tweed Ride. Meet up time is 10am, ride departing at 1030am. This year we will ride out to Jamaica Plain taking the Emerald Necklace to Franklin Park.

Bring food and supplies as we will be picnicking at Franklin Park before returning back to the Commons. As always this is a family friendly event, vintage bicycles are not required but dressing up is encouraged:tweed jackets, woolen knickers, dress shoes, bow ties, lace gloves, sun hats and the like. Helmets are not required but encouraged.

Ruth Works SF: hand-crafted bike bags made to order

Thursday, September 8th, 2011

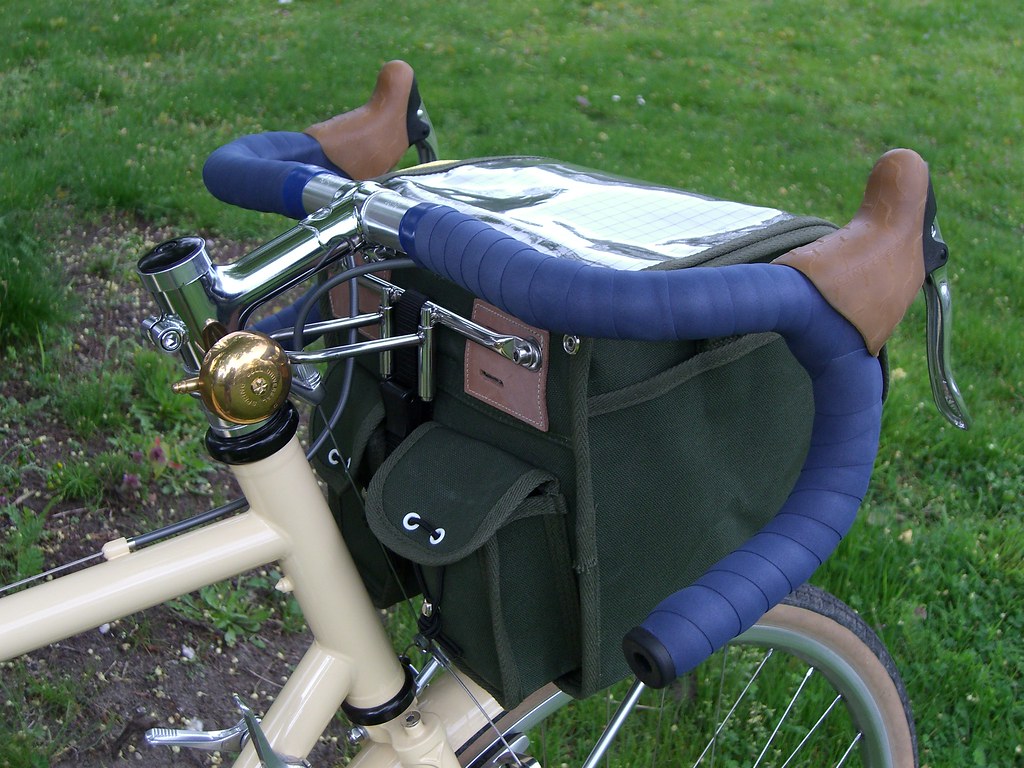
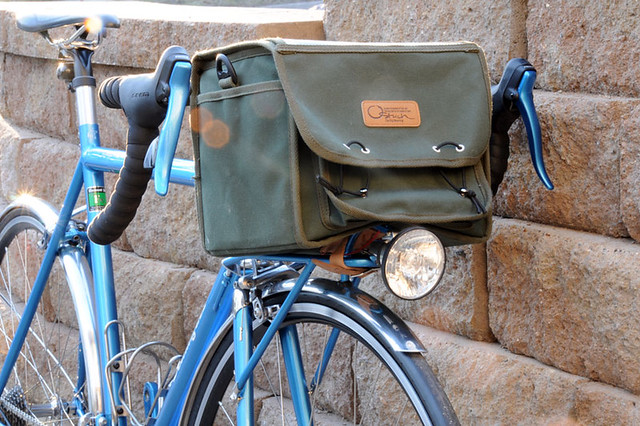
A cottage industry of classically styled and constructed bike bags has emerged over the last five or so years, as bikes modeled after classic designs have seen something of a revival. Just a few years ago, few companies other than the old standbys like Carradice and Gilles Berthoud made classically designed bike bags, but recently several small startups have stepped in to satisfy this new niche market. Small artisan operations like Zugster and Acorn have started to gain serious recognition among the bicycle cognoscenti for making high quality, thoughtfully designed bike bags, and there are an increasing number of lesser known startups contributing to this niche market. Most of these gigs are one- or two-person operations, hand-crafting bags in small batches. Often these folks are cyclists themselves who know what the important qualities in a bag are.

I was lucky enough to get in the queue for a new bag by a recent one-man startup. His name is Ely and he recently started making bags for folks on the iBob mailing list. Although new to the scene, he’s already made a bunch of rando bags, saddlebags and panniers (in addition to backpacks, wallets and other hand-stitched accessories), each custom-made to the customer’s specifications. I was able to bounce ideas off of him throughout the design process, which involved lots of email correspondence, and Ely built features into my bag that I thought would be neat to have, but which I had been unable to find in any commercially available offerings.

I wanted a small (~7L), classically styled rando bag with features commonly found on such bags: clear map sleeve on top, pouches facing the rider, elastic closures, etc. Then I threw in some unique ideas (or at least unique to my knowledge): velcro straps on bottom for securing to a rack, internal sleeves for stiffener panels, internal D-loop to hold a keychain, and a few other minor design details. I couldn’t afford a Berthoud– the brand widely regarded as the crème de la crème of this genre, and I could never hit the ‘submit’ button quickly enough whenever a batch of Acorn bags was posted for sale (Acorn bags are so highly sought after that they sell out within seconds of being made available for online order). No one else makes a reasonably priced bag that has everything that I wanted in a bag. So I decided to put my trust in Ely and see what our combined ideas may lead to. He made it clear from the start that he was in the learning phase, and that I shouldn’t expect a bag of Berthoud caliber. In return, he asked only for the cost of materials and shipping, and was appreciative of the trust put in him and for the opportunity to experiment and gain experience making bags. For the cost, I figured it would be a fun experiment: if it were to fail, I would at least have gotten to support a fledgling artisan.

When I received the bag, the first thing that struck me when I began to examine the bag closely was all the time that must have gone into constructing this bag. I think we take it for granted how much time and effort goes into something that has the overall appearance and outward simplicity of a fabric box, and balk at the prices that craftspeople must charge for their wares because we don’t comprehend all that goes into producing them. I can’t begin to imagine the hours measuring, cutting, sewing, punching, riveting, etc that Ely spent crafting this bag. Of course, once you have a template pattern established and you can churn out identical copies of the same article, production becomes more streamlined (and I imagine that this is the only way most established bag makers can price their bags affordably while still earning a profit), but for a completely custom-specified bag, it was humbling to think how much time and labor went into making it.

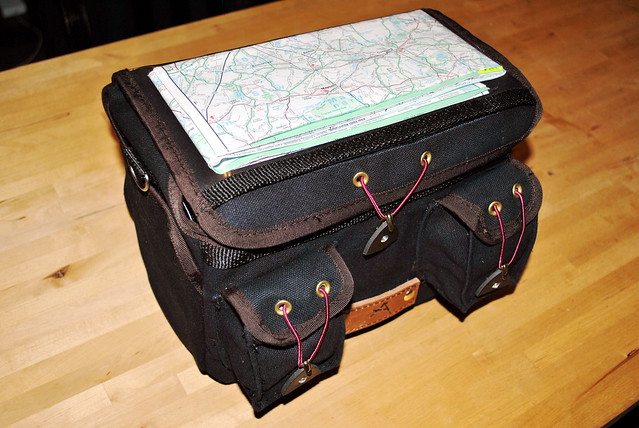
On to the finished product!

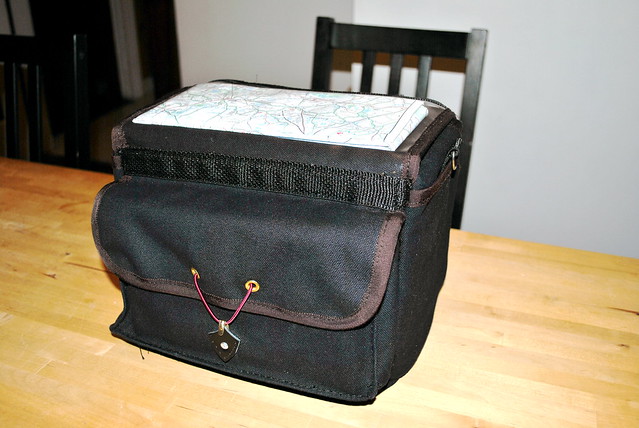
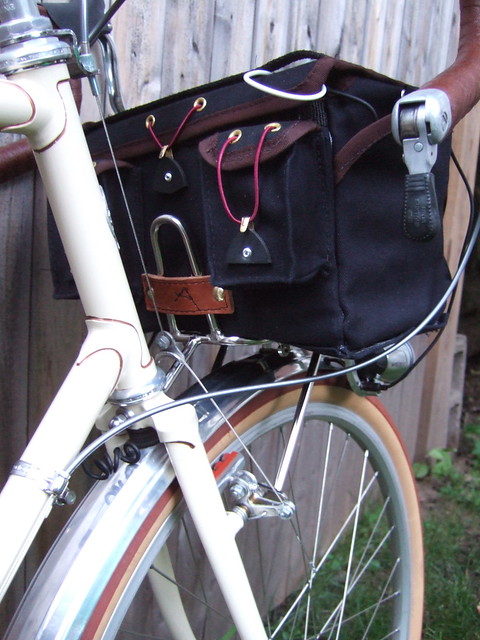
Map sleeve is closed on three sides, and has a velcro closure on the fourth side. It fits a standard folded map, or an 8×11″ cue sheet folded in half. Side D-loops to attach a carry strap. External side sleeves. Two small pouches for cell phone, camera, energy bars, multi-tool, tube, etc. The small pouches snugly fit my camera, but unfortunately they are too small for my iPhone or wallet. Leather strap fits over rack tombstone:

Large front pocket can fit a rain jacket or extra clothing layers:


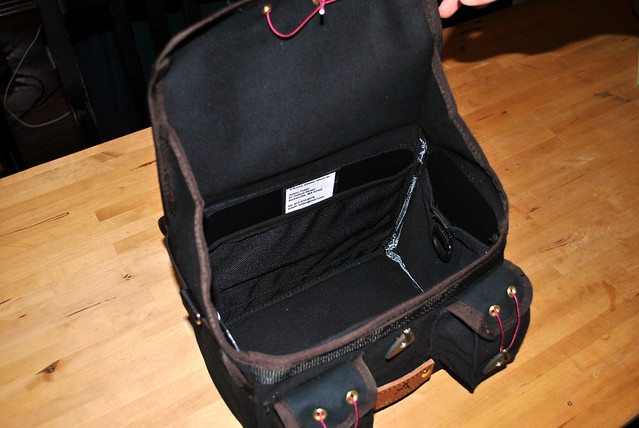
Internal sleeves on all sides and external sleeve on bottom are ideal for stiffener boards. Vinyl stiffener boards (which I sourced locally after receiving the bag) have been cut to size and added to all sides and bottom (one of my key objectives was to be able to use this bag without a decaleur, necessitating structural fortification with stiffener panels). Top flap opens facing the rider, and has integrated expansion flaps. These fold in when closed, but allow the top flap to bulge past the top of the bag when over-stuffing the bag, without creating a gap between the flap and the rest of the bag. This not only keeps rain out, but also helps prevent things from falling out as they get jostled around the bag. (This was Ely’s idea, and I love it!).

Velcro straps on bottom fit most any front rack:


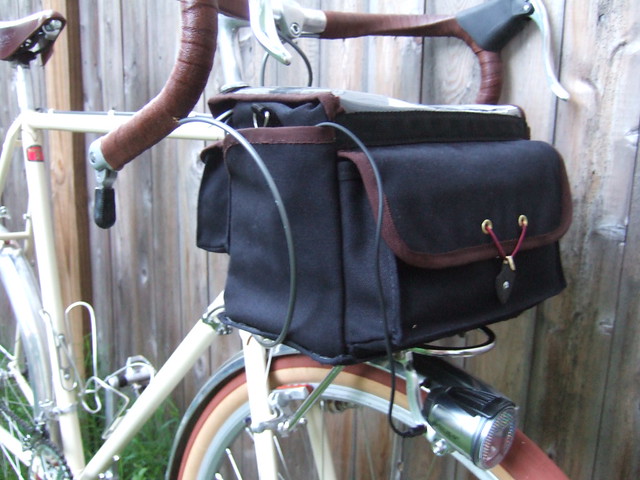
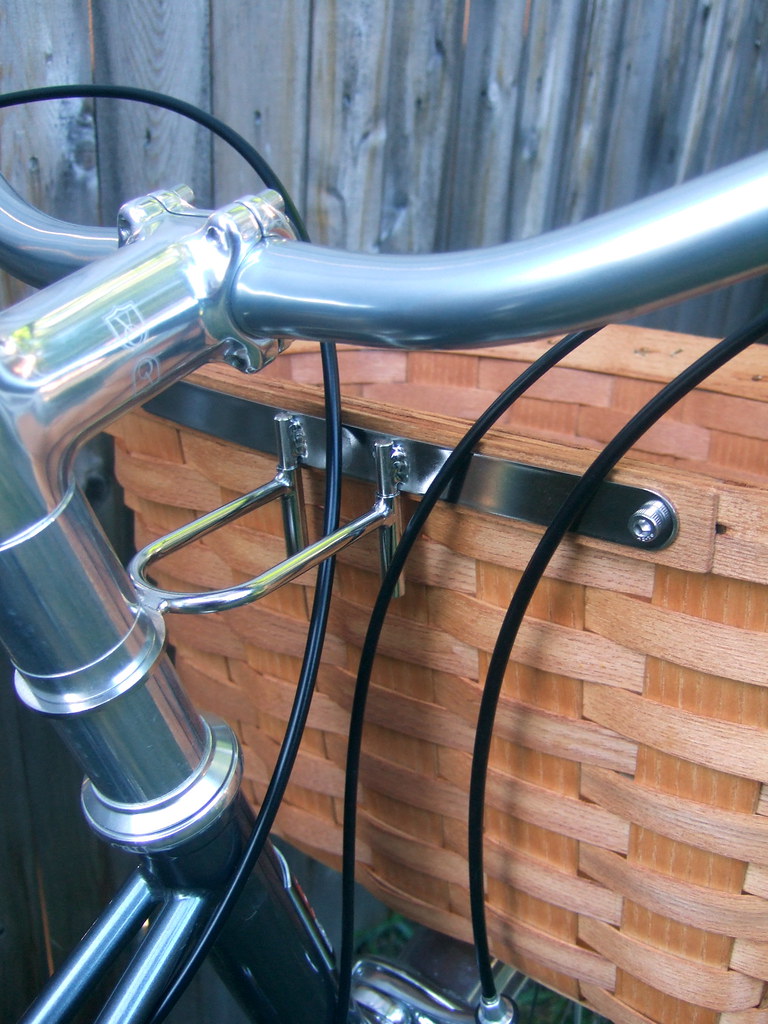
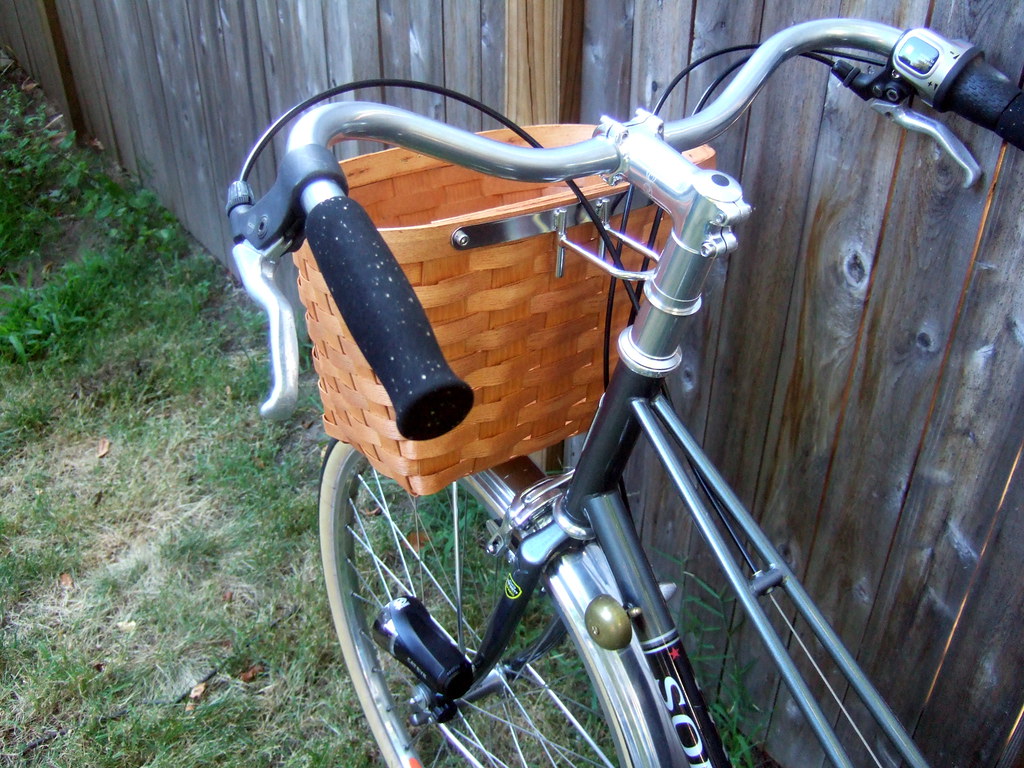
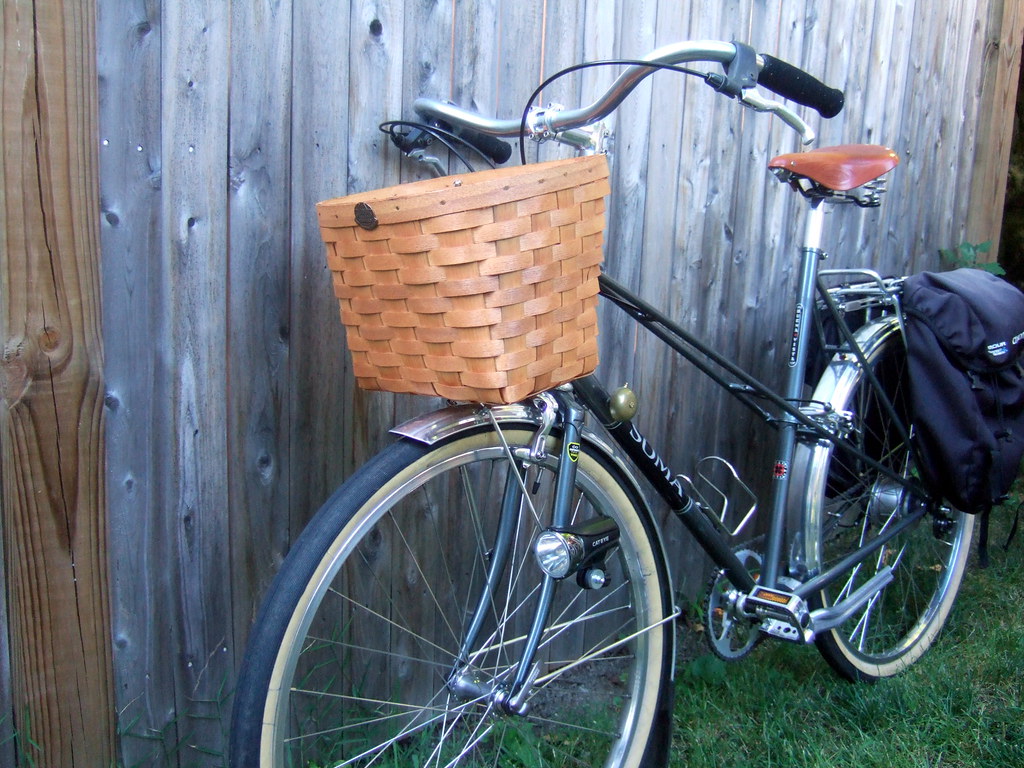
Bag mounted to bike:

On my first test ride with the bag, which involved dirt roads and bumpy trails, it became clear that the attachment provisions as designed were insufficient. I found that I had to add a small nylon strap (which I brought with me just in case) between the leather sleeve that slides over the tombstone and the bottom of the rack, to keep the back of the bag from lifting when riding over really large bumps. In addition, the velcro straps on bottom couldn’t keep the bag from sliding slightly from side to side on the rack. To be fair, I wouldn’t say the design is defective. Even the best bags wobble around when not supported by a proper decaleur, and I see this on lots of bikes with front bags. And this bag would do fine as-is if ridden on regular roads. But, I wanted something that would stand up to the rough and tumble of washed out dirt roads and fire trails strewn with rocks and branches.

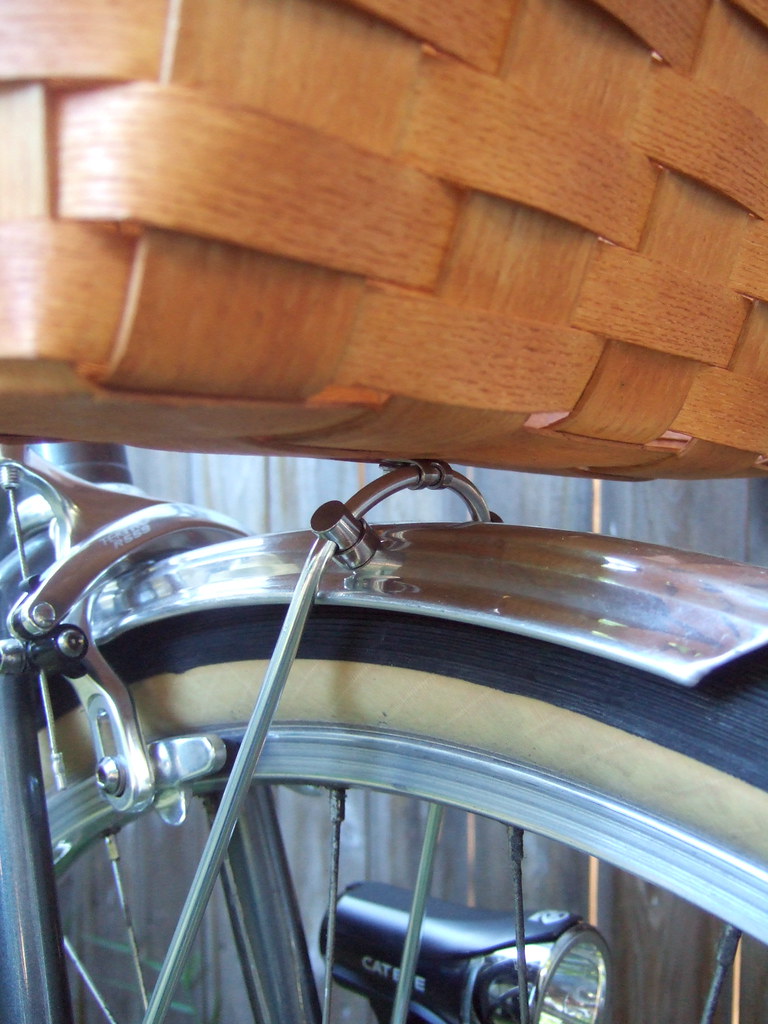
To fortify the attachment without resorting to using a decaleur, I borrowed a trick from renowned frame builder JP Weigle, which is to drill two small holes in the bottom of the bag and use two small nylon R-clips with bolts and wing nuts (Weigle used knurled brass nuts) to secure the bag to the rack. This method keeps the bag firmly planted to the rack, but at the expense of making it a little cumbersome to remove the bag and reattach it to the rack. Since I don’t plan on taking the bag off the bike while on day-long rides, this isn’t a real problem for me, and it beats the extra weight and clunkiness of a decaleur. (A decaleur, on the other hand, provides a convenient quick-release system for people who want to take their bags with them when off the bike). Here’s a rough field photo (literally from a field) showing the supplemental, rock-solid mounting scheme (sorry for the lack of detail in this crop-zoom):

The final test for the bag with the revised attachment method was the D2R2 ride from a couple weeks ago: 74 miles of mostly dirt roads with plenty of bumps. The bag was stuffed, and held on with the two R-clips bolting the bag to the rack up front, and a short strap holding the back end down. The bag held up great, keeping its shape without flopping around or sagging. It kept its contents safely inside, even on the worst bumps. It bobbed up and down slightly when going over bumps as the stiffener panels flexed a bit, but this is expected of most bags, especially without a decaleur.

Here’s the view from the cockpit. Note that while I couldn’t keep my iPhone in one of the small pouches as planned, it fit just fine inside the map sleeve and didn’t obscure the cue sheet. The map sleeve’s velcro closure kept the iPhone safe inside for the entire ride; I wasn’t concerned for a single moment that it might get hurled out, even when descending steep dirt roads at 40 mph (no, I didn’t snap this shot during one of those descents, that would have amounted to suicide):

Since the whole process was an experiment (for both Ely and me), it was expected that there would be a few design details that didn’t work out as planned. This has turned out to be the case, but only to a limited extent– the pouches being too small for wallet/iPhone, for example. But that’s nitpicking, and honestly I’m tickled with the bag. Plus, I suspect that Ely is integrating comments he’s getting back “from the field” once his bags have been put to use, so I predict his bags will only get better as he gains experience and feedback. Some of the fine details like the trim stitching may appear less than perfect under close scrutiny compared with, say, a Berthoud or Carradice, and parts of the bag aren’t perfectly symmetrical, but so what? It’s a one-of-a-kind, handmade article! It’s got character, and I think it looks fantastic on my bike. More importantly, the seams appear to be strong. The rivets are reinforced. The bag is not under-built.

I’m also waiting on a small saddle pouch from Ely. I’ll post about that once I’ve gotten it and have had the chance to test it out.  Ely has a blog, and can be contacted through there. I have no idea what his current lead time is, nor his current pricing schedule. If you have an idea for your perfect bag, bounce it off him! He’s super nice to correspond with. And, you’d be supporting an independent craftsman and getting a truly unique and custom tailored bicycle accessory!

Attaching a basket using a decaleur and fender stay

Saturday, July 30th, 2011

Baskets are a convenient, inexpensive and attractive way of adding practicality to a bike.  Most baskets attach to bikes using leather straps that attach to the handlebars.  This method is not secure, and allows the basket to bounce around and rub against the bike’s head tube and fender.  Some baskets come with sturdy quick-release hardware that attaches to the handlebars. While this solves the problem inherent to straps, often this attachment method places the basket high above the front wheel, which is less than optimal for bike stability. I’m also not a fan of clamping things to handlebars in general, as this tends to clutter the bars.

For many decades, bikes designed to carry front “randonneuring” bags have utilized specialized hardware designed to keep the bag securely mounted to the front of the bike while also allowing the cyclist to remove the bag quickly and easily.  This was common on old French randonneuring bikes, and the approach has seen a resurgence in popularity among randonneuring cyclists.  The device is called a decaleur, and is composed of two pieces that interlock:  one piece mounts to the headset or stem of the bike, while the other piece mounts to the bag. The two parts interlock to create a quick-release interface between the bike and bag:

Velo Orange headset-mounted decaleur, securing an Ostrich rando bag. Image courtesy dagoldenberg via flickr.

The decaleur holds the bag upright and centered, and a small but sturdy front rack, attached to the bike’s fork, serves as a perch for the bag. The majority of the bag’s weight is supported by the rack.  The bag is secured to the rack with a strap:

Ostrich rando bag strapped to a front rack. Image courtesy Vincent Dominguez via flickr.

When my wife mentioned that she wanted a basket for the front of her bike, I began thinking of ways to attach it that not only would be more secure than the handlebar strap method, but would also position the basket as low as possible above the front fender to maximize the bike’s stability.  Essentially, I wanted to take the randonneuring bag concept and apply it to a basket.  The idea of a decaleur plus front rack appealed to me, but I couldn’t justify spending -100 on a front rack, plus another for a decaleur.  Not to mention that my options for a front rack would be limited for this bike, for reasons I won’t go into.  Some people find that just a rack alone is sufficient to secure a basket using zip-ties, but I wanted something more integrated.  I noticed that many of the old French bikes used additional hardware to secure the front fender, presumably so that the fender could support the additional weight of a headlight without wobbling or shaking loose over time.  This hardware was typically just an additional fender stay, as can be seen on this old (and beautiful!) French bike:

Front fender secured at three points:  fork crown and two stays. Image courtesy protorio via flickr.

My wife’s bike has traditionally inspired Velo Orange aluminum fenders, and since Velo Orange happens to sell not only decaleurs but also extra fender stays and hardware at reasonable prices, I decided my strategy would be to use a decaleur in conjunction with an extra fender stay.  The decaleur would hold the basket upright and centered, and prevent movement, while the fender stay would prop the basket from below.  Total cost of hardware:  .

First, I installed the decaleur much the same as if I were mounting a rando bag:  I mounted the receiver half to the headset of the bike (in this case, a 1-1/8″ threadless Velo Orange headset).  I positioned it midway between the stack of spacers, as that was the position that worked best with the basket we chose for the bike (a Peterboro basket).  Then I mounted the bag half of the decaleur to the basket by drilling two 6mm holes in the top lip of the basket, aligned with the two pre-drilled holes in the decaleur.  The top lip of this basket is made up of several layered strips of wood and is very sturdy. The 5mm bolts that came with the decaleur were just long enough to fit through the thick multilayered lip and accept the provided nylock nuts with washers.

Decaleur mounted to a threadless headset and basket. Note that the decaleur positions the basket well below the handlebars.
Next, I needed to install the additional fender stay.  This required some small specialized hardware bits, also available from Velo Orange for a few bucks.  Needed were two R-clips, for attaching the stay ends to the threaded bosses or dropout eyelets, and two drawbolts, for attaching the fender to the stay.  Fortunately, my wife’s bike has 5mm threaded bosses midway along the fork blades. These are usually reserved for mounting low-rider pannier racks, but in this case, provided a convenient mounting location for the stay.  If those bosses weren’t there, no problem– the stay could just extend to the dropout eyelets. I had already used one of the mid-fork bosses to mount a headlight using a home-made mount, but I was able to piggyback both the stay and the headlight mount:
Fender stay attached to mid-fork threaded boss using an R-clip.  Headlight mount is piggybacked with the R-clip.
To attach the fender to the stay, two 6mm holes were drilled in the fender on either side to accept the drawbolts.  Before sliding all the pieces into place, a third R-clip was placed on the stay, centered between the drawbolts.  This would be used to secure the bottom of the basket. Once the stay was in place, a 6mm hole was drilled in the bottom of the basket through two layers of weaved wood, and the basket fastened to the R-clip with a 5mm bolt:
Two drawbolts secure the fender to the stay, while an R-clip centered between the drawbolts secures the basket to the stay.
The net result is a basket that is neatly and securely attached to the bike at three points:  two points provided by the decaleur along the top lip of the basket, and a third point at the bottom of the basket provided by the fender stay.  The three points create a triangulated attachment scheme which eliminates any movement of the basket, and the basket does not rub against any part of the bike.  Ideally, most of the load of the basket should be supported along the bottom, while the decaleur serves more to support the sides of the basket from tilting side to side, or back and forth, as the bottom of the basket bends and deforms under load.  Since in this setup, the bottom of the basket is supported at only one point near the center of the basket, it remains unclear how well the basket will hold up over time using this method. One way to better distribute the support along the bottom of the basket would be to add a rigid metal (or strong plastic) bar (similar in length to the basket-half of the decaleur itself) along the bottom of the basket.  The bar could be attached at three points, the center point also being the attachment point for the R-clip.  Initial testing with a light load (e.g., handbag) demonstrated the basket to be sturdy and free of any movement. Time will tell how well the basket holds up with a variety of loads.
A secondary benefit of using an extra fender stay is that the fender itself becomes much more secure than before.  Typically, front fenders are attached to the bike at only two points:  the fork crown and the stay (just one stay, but occasionally two).  By contrast, rear fenders, which are longer and thus require additional attachment points, are usually secured at at least three points:  the chainstay bridge and brake bridge, and either one or two stays. Thus, rear fender attachment is at a minimum triangulated, while front fender attachment is not.  By adding a front fender stay to support the basket, the front fender attachment becomes triangulated and more secure.

D2R2

Thursday, July 21st, 2011

D2R2 has a more popular meaning but I like to think of it as Dry Dirt Road Riding. Such roads are perfect for the vintage (or vintage-like) all-road cycle. No need for those knobbly tires, just ones that are slightly wider and still work great on pavement. You can even take a three-speed on most. Furthermore, one can ride out to such roads easily on an all-road bike, without having to drive.


For a few years, I’ve been trying to create a map of the dirt roads in the Greater Boston Area. This is fun cycling and I don’t see a need to keep these great roads a secret. But more so, we could use the help finding more great roads that are nearby and good for all-road bikes.


Here is my map centered on Concord & Lincoln. Pan around, there are other great roads on the North and South Shores.

View East Mass Dirt Roads in a larger map

Of course, D2R2 is more than just riding on dirt roads now that mud season has ended (not that we have much of a mud season in Boston 🙂 The real D2R2, that is Deerfield Dirt Road Randonee, is only about six weeks away; and registration is still open… Which means it is time to get some preparation rides in.


I just put together a map of a few D2R2 preparation routes in the Boston Area. Over the years I’ve ridden on each to varying degrees and I plan to ride on them more in the next few weeks to get ready. The map is intended to be displayed with ‘East Mass Dirt Road’ map posted above, so you can see what is dirt and what isn’t.

View D2R2 Preparation Routes in a larger map

I have mapped three routes. The two just west of Boston are the routes that I typically ride, and I suspect most here will understand the best. The Prospect Hill Loop is one of the best hill climbs in the area. The BCC Loop is nice specifically because of the large quantity of unpaved roads, though pedestrians will likely slow you down.

The Plymouth Loop is one I did a few years ago. The dirt roads here are nice, but can be rough, and thus good practice for D2R2. You can even take the commuter rail down. Just make sure you don’t miss the train back, but if you do there is a fancy pizza joint nearby.

I’ve ridden on a North Shore loop, which is almost a century. It didn’t have as much unpaved roads, but it is a very nice place to ride. There were a couple fords and a few of the old roads are a good challenge. Once I find the cue sheet, I’ll add it to the map.


If you have another route or other dirt road suggestions, let us know and I’ll update the maps.

Lastly, if you’re looking for others to ride these roads with, post a comment, I’m sure others (including myself) would enjoy your company on our next ride.

Cape Cod and Away

Friday, July 1st, 2011

It is summer and time for a pleasant and relaxing holiday. Whether a weekend or a week we have a suggestion for you, yours and your trusty three, ten or twenty-one speed.

Take a trip to the Cape.

Last we checked, all you need is your bike and a saddle bag or two.

And we checked pretty recently. Our good friends, and contributors to BRW, Kyle & Megan toured Cape Cod last month for a long weekend. They started from P’town and ended in Sandwich using the ferry and bus to get from Boston and back. They both rode three speeds and had a wonderful trip.
Family Biking – Cape Cod


One of the more challenging aspects of bike touring on the Cape is getting a single night reservation, so you can continue on your tour the next day. Hosteling International Cape Cod will accommodate that touring aspect for you. Hostels are one of the few places in the Cape where you can reserve a bed, and sometimes even a room, for only one night.

Hosteling was started in the US during the 30’s with bicycling in mind. So, the five hostels on the Cape are all within a comfortable days bike ride between them. Obviously you would need to take the ferry to get to the Nantucket or Vineyard hostels.

Hosteling Cape Cod just finished a competition showing how easy it is to bike the Cape by hostel. Check out the video:

Hopefully you’ll get out to the Cape if so, take photos and let us know.

Mister Nutter Cycling Caps

Saturday, June 25th, 2011

Mister Nutter is a clothier less than an hour north of Boston whom makes very nice cycling caps using reclaimed fabrics from vintage clothes and furniture. Always out on the search for just the right textiles for the next custom order.

I first met Mister Nutter almost two years ago when he came to Broadway Bicycle School in Cambridge where I was then a mechanic. We were all impressed with the quality and needlework and proudly became the first Boston area retailer to sell his wares. Orders can also be placed from his Etsy storefront.

Designs range from traditional tweed, buffalo plaid, military wool, to cotton it with vintage ties turned into racing stripes. Whenever I am wearing one of his caps (I have two), people always stop me to compliment and ask about where I purchased it. I am currently waiting for my custom order for a “train engineer” cycling cap. He has plenty of the fabric and you can get one too. His handiwork is not just limited to caps, this summer he now also has vintage bathing suits as well. If you are looking for local made, recycled, handmade, and stylish to go well with your bike then a Mister Nutter cap is for you.